Categories
Categories
- Home
- Instructions
Instructions
English Instructions Spanish Instructions
Polar Teeth Whitening Instructions
Please read ALL instructions before beginning.
Step 1: Brush and floss your teeth just prior to starting whitening treatment.
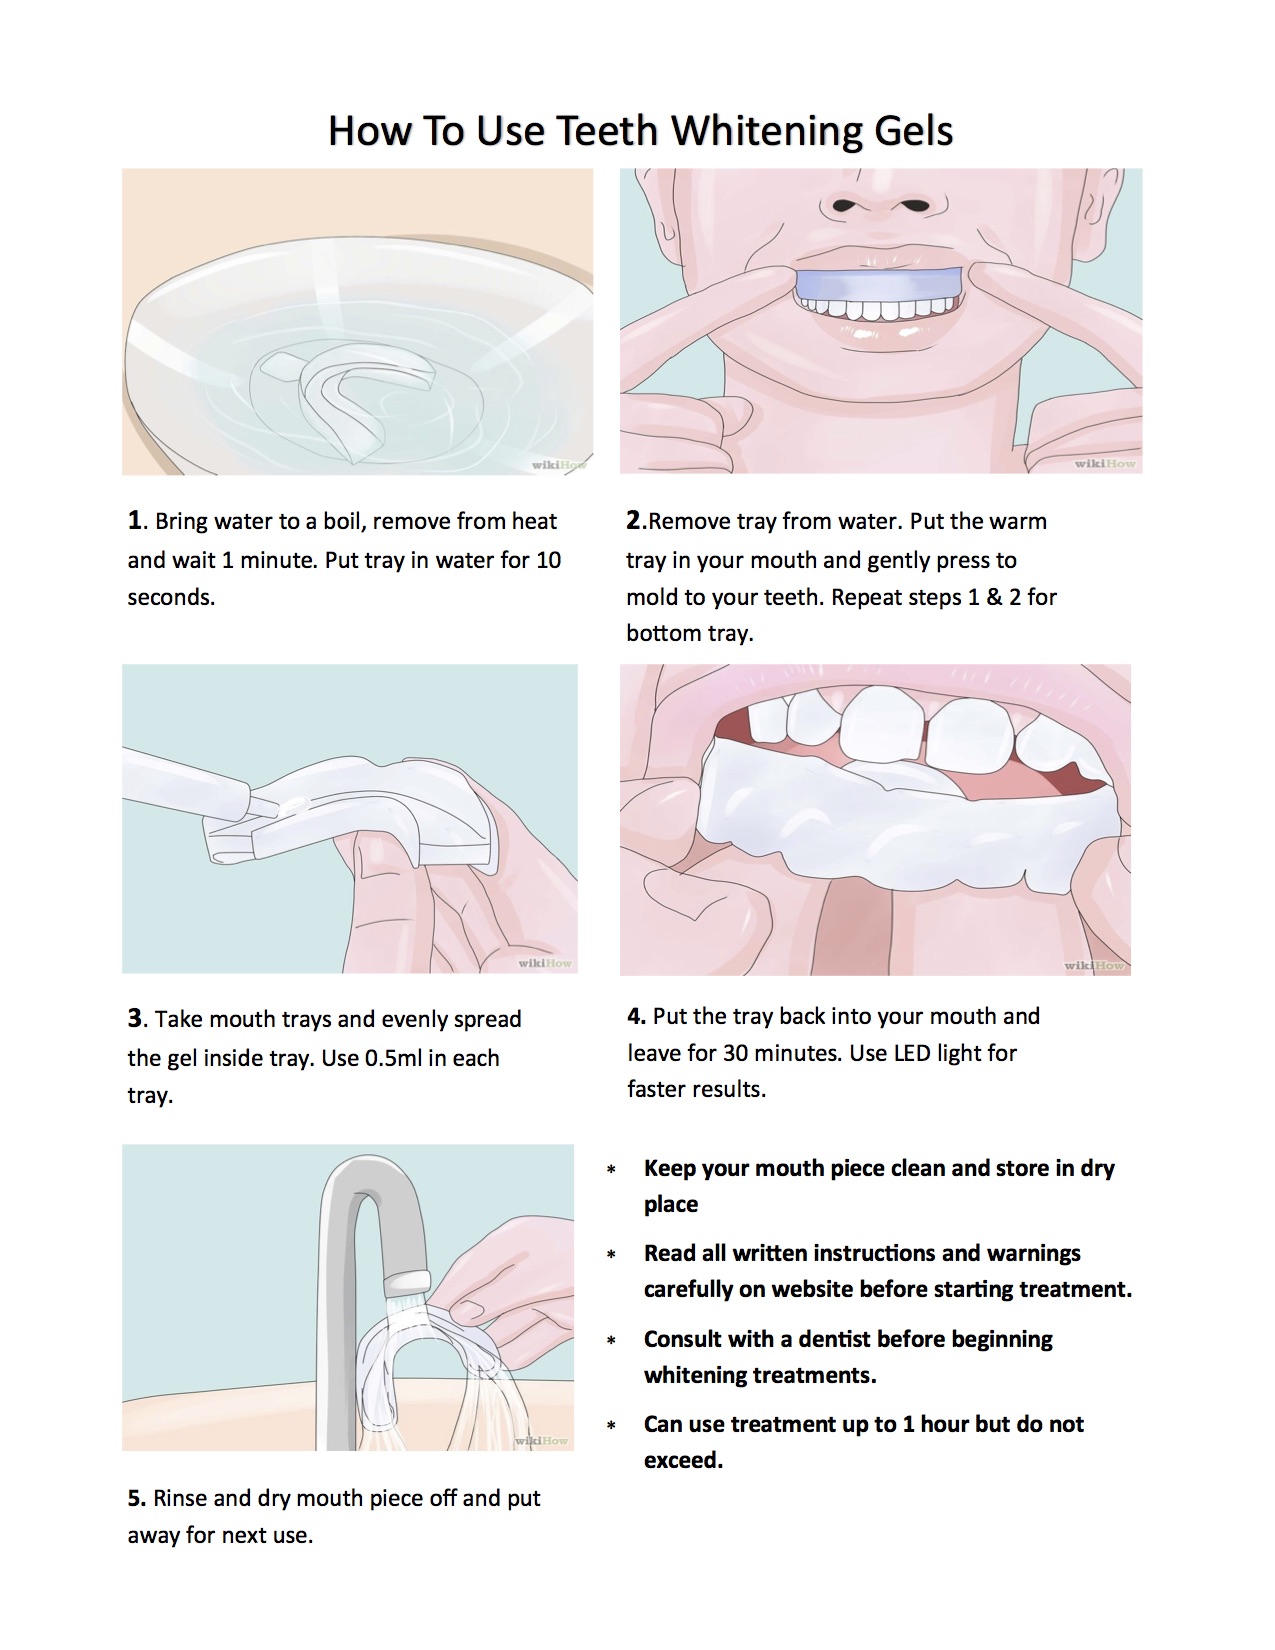
Step 2: Bring a pot of water to boiling point, remove from heat. Wait one minute before dipping the tray into the hot water. Hold by the tab on the front of the tray and dip into the water and leave for 10 seconds.
Warning: Leaving tray in hot water too long will cause it to fold over and stick to itself!
Step 3: Remove from water and immediately insert tray into your mouth. Using your fingers, firmly press the tray up on your teeth to form the perfect mold for whitening! Repeat this process to complete the other mold. You should now have molded top and bottom trays. You can cut off tabs as well as trim the back of the tray if it is too large for your mouth.
*This is a one-time process but you can re-dip the trays in the same hot water (not reheated) for 5 seconds for a better mold fitting. After trays are molded you keep and store them for continued whitening.
Step 4: Now, remove clear cap from syringe that contains the whitening gel. Put pea size amount of gel in each indention on the inside of top and bottom tray. Use the tip of the syringe to spread the gel evenly around tray. You should not use more than 0.5ml of gel per tray. Recap gel.
Step 5: Insert each tray into your mouth and press to give firm fit. Use a wash cloth or tissue to wipe off any excess gel that may seep over the tray onto your gums. This could cause gum irritation so make sure you remove the excess.
Step 6: Now it is time to put the LED light in place to ensure a faster whitening process! Place the light in your mouth with the clear shield between the trays and the inside of your lips. The light should remain there until the treatment is completed. The light will cut off after 30 minutes. If you chose to whiten longer then restart the light and continue the process. Whiten minimum 30 minutes up to 1 hour per application.
*To get the light to work for the first time, remove the little circle on the back of the light, take out battery and remove plastic tab. Put battery back in and replace circle. Turn light over and press the button to start the process.
* You may do a treatment once a day for 10-14 consecutive days.
Step 7: After you finish the whitening session, remove the mouth trays, rinse and dry. Store in case to keep clean and free of bacteria/mold.
*Case can be purchased online if the kit purchased does not include one. Our Artic Premium Kit includes storage case.
Remineralization Gel: To be used after each whitening treatment. This blue gel is used to replenish and restore key minerals that may be lost during the whitening process as well as aid in any tooth sensitivity that may occur. This gel is in our premium kit or can be purchased separately.
How to use: After a whitening treatment, rinse and clean trays and dry completely. Then put small amount of blue gel in mouth tray just as you did with the whitening gel. Wear the trays for 15 Minutes. LED light is not used with this gel. When finished clean trays with a tooth brush, dry and store in dry place.
Polar Pen: Remove cap and twist until gel is visible. Simply paint over your teeth and hold your smile for 30 seconds until dry. Wipe off any that may get onto your gums. Whiten for 15 up to 30 minutes .
Polar Pen with LED Light: Remove cap and twist until gel is visible. Simply paint over your teeth, allow 30 seconds to dry while smiling, and use the LED light for minimum 15 minutes up to 30 minutes. No need to rinse or brush afterwards. Smile and Go! The 5 LED light is our second strongest light. You will be amazed at the increased whitening power!
Single and 5 LED Light: To get the light to work for the first time, remove the little circle on the back of the light, take out batteries and remove plastic tab. Put batteries back in and replace circle. Turn light over and press the button to start the process.
7 LED Light: To get the light to work for the first time, take plastic off of battery and insert battery into light. Mouth tray attaches to end of light. Apply gel to mouth tray and begin whitening process. Follow whitening process above.
Light Warranty and Registration: Go to polartw.com. On home page scroll down to warranty and coupon sign up. Click to register.
WARNING: Keep out of reach of children. Avoid contact with eyes or skin. If contact occurs, wipe gel off and rinse with water. DO NOT use if pregnant or nursing. DO NOT use if you wear braces, have gum disease or any issues with decaying teeth. DO NOT use if you have had recent oral surgery or any open wounds in your mouth. ALWAYS consult your dentist before beginning treatment. If irritations such as blisters in the mouth, on lips or gums occur then discontinue using whitening treatment. If you experience a sharp pain in a tooth, then discontinue treatment and contact your dentist.
For Best Results: To achieve amazing results you should avoid staining beverages such as dark sodas, coffee, tea, red wine, and red juices during the duration of your treatment. . Also AVOID smoking as much as possible.
Storage: You may store the gel in the refrigerator to keep the gel fresh for up to 1 year. Always wash your trays with a toothbrush after treatment and use of remineralization gel. Always dry mouth tray completely. Store in a dry place. ( Polar Classic Case )
Whitening Gel Ingredients: Glycerin, Urea Peroxide, Aqua, Potassium Nitrate, Acrylates/c10-30 Alkyl Acrylate Crosspolymer, Mentha Piperita (peppermint) Oil, Sodium Hydroxide, Disodium Edta
Remineralization Gel Ingredients: Active Ingredient: Sodium Fluoride (0.15%w/v Fluoride Ion) Other Ingredients: Glycerin, Aqua, Potassium Nitrate, Acrylates/c10-30 Alkyl Acrylate Crosspolymer, Calcium Phosphate, Sodium Hydroxide, Sodium Saccharin, Mentha Piperita (peppermint) Oil, Sodium Benzoate, Ci42051
DO NOT USE IF PREGNANT OR NURSING.
ALWAYS CONSULT A DENTIST BEFORE STARTING TREATMENT.
SELLER IS NOT RESPONSIBLE FOR USEAGE OF THESE PRODUCTS.

SPANISH INSTRUCTIONS
Instruccciones de Blanqueamiento de Dientes Polar
Por favor lea TODAS las instrucciones antes de iniciar
Primer Paso: Cepille y limpie con hilo dental los dientes antes de iniciar el tratamiento de blanqueamiento.
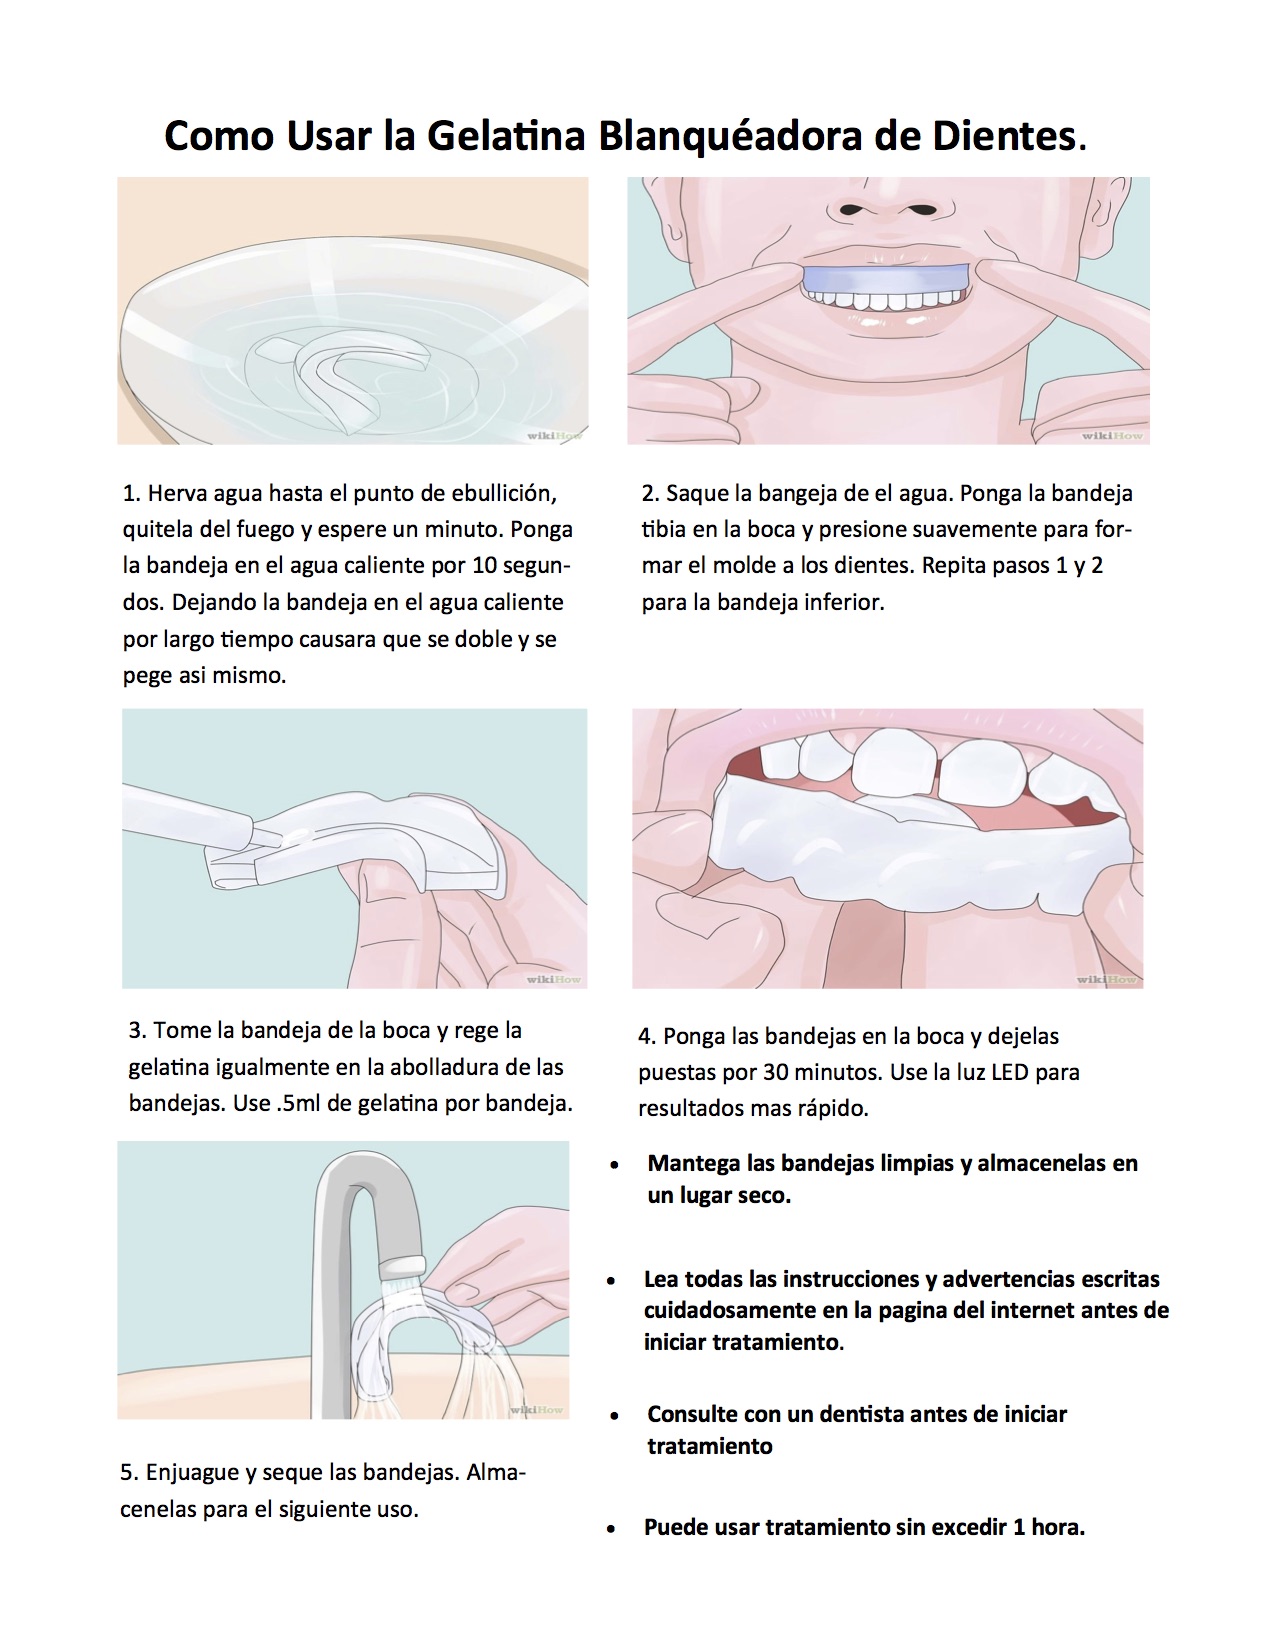
Segundo Paso: Herva agua hasta el punto de ebullición, quitela del fuego. Espere un minuto antes de sumergir la bandejas en agua caliente. Agarre el soporte al frente de la bandeja y sumerjalo en el agua y dejelo por 10 segundos.
Advertencia: Dejando la bandeja en el agua caliente por largo tiempo causara que se doble y se pege asi mismo.
Tercer Paso: Saquelo del agua e inmidiatamente inserte la bandeja en la boca. Usando los dedos, presione firmamente la bandeja asi a los dientes para formar el molde perfecto para el blanqueador. Repita este proceso para completar el otro molde. Usted ahora a moldeado la parte superior e inferior de las bandejas. Usted puede cortar el soporte, asi como recortar la parte posterior de la bandeja si es demasiado grande para la boca.
*Este proceso se hace solo una vez. Despues qe las bandejas esten moldeadas va a mantenerlas y almacenarlas para continuar el blanqueamiento.
Cuarto Paso: Ahora remueva la tapa transparente de la jeringa que contiene la gelatina blanquéadora. Ponga la cantidad de un frijol de la gelatina en cada abolladura en el interior superior e inferior de las bandejas. Utilice la punta de la jeringa para regar la gelatina igualmente alrededor de las bandejas. Usted no debe usar mas de .5ml de gelatina por bandeja. Cierre la gelatina.
Quinto Paso: Inserte cada bandeja en la boca y presione para dar ajuste firme.Utilice un paño de lavado o tejido para limpiar cualquier exceso de gelatina que puede escurrirse sobre la bandeja en las encìas. Esto podrìa causar irritación de encìas, asì que asegúrese de quitar el exceso.
Sexto Paso: Ahora es tiempo de poner la luz de LED en lugar para garantizar el proceso de blanqueamiento es mas rápido! Ponga la luz en la boca con el escudo claro entre las bandejas y el interior de los labios. La luz debe permanecer alli hasta que el tratamiento sea completado. La luz se va a apagar despues de 30 minutos. Si elige blanquear mas, reiniciar la luz y continue el proceso. No exceda 1 hora por aplicación.
*Para que la luz trabaje por primera vez, quite el pequeño cìrculo en la parte posterior de la luz. Saque la baterìa y retire el soporte de plástico. Ponga la baterìa de nuevo y reemplaza el cìrcilo. Dele vuelta a la luz y prense el botón para iniciar el proceso.
*Usted puede hacer un tratamiento una vez al dia por 10-14 dìas consecutivos.
Septimo Paso: Después de terminar la sesión de blanqueamiento, quite las bandejas de la boca, enjuague y seque. Almacene en estuche para mantenerlo limpio y libre de bacteria.
*Un estuche puede ser comprado en la computadora, si el equipo que compro no lo incluye. Nuestro equipo Artic Premium incluye un estuche para almacenamiento.
Gelatina de Remineralización: Para ser utiizado después de cada tratamiento de blanqueamiento. Esta gelatina azul es usada para reponer y restaurar minerals claves que pueden ser perdidos durante el proceso de blanqueamiento, asì como ayudar cualquier sensibilidad en los dientes que pueden ocurrir.
Cómo Utilizar: Después de terminar el tratamiento de blanqueamiento, enjuage y limpie las bandejas, seque completamente. Luego ponga una pequeña cantidad de gelatina azul en la bandeja e inserte en la boca, como lo hizo con la gelatina blanquéadora. Deje las bandejas puestas por 15 minutos. La luz de LED no se utiliza con esta gelatina. Cuando termine, limpie las bandejas con un cepillo de dientes, seque y almacene en un lugar seco.
Advertencia: Mantenga fuera del alcance de niños. Evite contacto con los ojos o piel. Si contacto ocurre, limpie la gelatina y enjuage con agua. NO UTILICE si está embarazada o amamantando. NO UTILICE si usa frenillos de dientes, tiene nfermedades de la encìas o problemas con dientes que se decae. NO UTILICE si usted ha tenido cirugìa oral recientemente, o si tiene heridas abiertas en la boca. Consulte SIEMPRE con su dentist antes de iniciar tratamiento. Si irritación ocurre como ampollas en la boca, en los labios o encìa suspenda el uso del tratamiento de blanqueamiento. Si usted experimenta un dolor agudo en los dientes, suspenda el tratamiento y póngase en contacto con su dentist.
Para obtener mejores resultados: Para logra resutados sorprendentes se debe evitar bebibas que manchen como refrescos oscuros, cafés, tés, vino rojos y jugos rojos durante la duración del tratamiento. Tambien evite fumar lo mas posible.
Almacenamiento: No almacene la gelatina en refrigeracón. Siempre lave las bads con un cepillo de dientes despues de cada tratamiento y despues de usar la gelatina de remineralización. Siempre seque completamente las bandejas de la boca. Almacene en un lugar seco.
Whitening Gel Ingredients: Glycerin, Urea Peroxide, Aqua, Potassium Nitrate, Acrylates/c10-30 Alkyl Acrylate Crosspolymer, Mentha Piperita (peppermint) Oil, Sodium Hydroxide, Disodium Edta
Remineralization Gel Ingredients: Active Ingredient: Sodium Fluoride (0.15%w/v Fluoride Ion) Other Ingredients: Glycerin, Aqua, Potassium Nitrate, Acrylates/c10-30 Alkyl Acrylate Crosspolymer, Calcium Phosphate, Sodium Hydroxide, Sodium Saccharin, Mentha Piperita (peppermint) Oil, Sodium Benzoate, Ci42051
NO UTILICE SI ESTA EMBARAZADA O AMAMANDO.
CONSULTE SIEMPRE CON UN DENTISTA ANTES DE INICIAR TRATAMIENTO.
EL VENDEDOR NO ES RESPONSABLE POR EL USO DE ESTOS PRODUCTOS.

 Loading... Please wait...